Add SSH host key fingerprint to Jenkins for Git checkouts

I have a self-hosted Gitea instance, and also operate my own Jenkins instance. On the Jenkins instance, strict host-key checking is enabled. When adding the first reference to a Git repository hosted on my server, the following error appears:

Failed to connect to repository : Command "git ls-remote -h -- ssh://git@<myserver>:22222/martin/jenkins-test-docker-pipeline.git HEAD" returned status code 128:
stdout:
stderr: No ECDSA host key is known for [myserver]:22222 and you have requested strict checking.
Host key verification failed.
fatal: Could not read from remote repository.

Please make sure you have the correct access rights
and the repository exists.

The reason is that since it’s the first time I’m accessing a repository on this server, so the SSH host fingerprint is not in the known_hosts file for this SSH connection. Since I run this installation of Jenkins inside a Docker container and I don’t want to manually edit files in the file-system, I rely on setting the appropriate settings in Manage Jenkins > Security > Git Host Key Verification Configuration. This is set to Manually Provided Keys.

The easy solution is to set it to Accept First Connection. But I want to be stay on the manual mode. The easiest way to get the SSH host fingerprint via ssh-keyscan (-p 2222 is for specifying the SSH server port, which is a non-standard port in my case):

ssh-keyscan -p 22222 myserver

The output looks like this:

# myserver:22222 SSH-2.0-OpenSSH_9.1
[myserver]:22222 ssh-rsa AAAAB3NzaC1yc2EAAAADAQABAAABAQC085ixMnTlpr0pxXmkeJ6X479mbW/9PGDeUvD8hnG7EVUn3WsnnSG8yZkmU+jzg2W+xmFd7WIdaYLt6UcGvCS3RZIye68+qu64UToKX6CdTQOWyj6z9kd8tLoPBobsBd7tRyGaXU4c4UkCR5M44KhYtbQz0bgL7u+sL0z+R3lbOVyXaYPiSmUf/Wsd8fA2VcdWHkXJx0MMNMSVj/hgkZR7RfHzP4SZSqRLhn/AzIdx4DDuyGyPbVxu1ppnFtumRwlBkgat9UpMWkelREhcUdJtrZO1KPpA6DOkxIH8X/WtXyWToS9EjPb8FVTvzdjG2C4Zi0DkogH3no9vQcXLiihz
# myserver:22222 SSH-2.0-OpenSSH_9.1
[myserver]:22222 ecdsa-sha2-nistp256 AAAAE2VjZHNhLXNoYTItbmlzdHAyNTYAAAAIbmlzdHAyNTYAAABBBDfTT9eEpDmd7ToGAorTW1X9uuJVhZl+KX9phmTpTy2e8U7l31jWn2TnKlXOp5oKgivpQ2cVjcTyazyrFB7MhgI=
# myserver:22222 SSH-2.0-OpenSSH_9.1
[myserver]:22222 ssh-ed25519 AAAAC3NzaC1lZDI1NTE5AAAAIFoEzPpEWApszceLM/jWHvAbrTppjsTzftw79yTSS5Po
# myserver:22222 SSH-2.0-OpenSSH_9.1

It only makes sense to copy the non-comment lines (the ones not starting with a # to the configuration).

Now Git checkouts to this repository should work, once you have configured the appropriate credentials.
Enable RSA-based public-keys for ssh when accessing legacy devices

When accessing old devices that are not yet using modern encryption algorithms, current Ubuntu installations might reject connection due to the signature algorithm for the public keys being disabled, e.g.

sign_and_send_pubkey: no mutual signature supported

You can enable this on a per-command level by adding the following option to your SSH command line:

ssh -o PubkeyAcceptedKeyTypes=+ssh-rsa ...

As an alternative you can add this permanently for a host by adding it to the host’s configuration in your $HOME/.ssh/config:

Host myhost
  PubkeyAcceptedKeyTypes +ssh-rsa

This also works for other key types like ssh-dss.

Note: In general you only should do this if you access legacy devices where you have no possibility to upgrade to state-of-the-art encryption algorithms. Those algorithms got deprecated for a reason. Therefore always do this on a per-command or per-target-host level instead of blindly enabling those algorithms in your global SSH config.

Speeding up Btrfs RAID1 with LVM Cache

Logical Volume Manager 2 (lvm2) is a very powerful toolset to manage physical storage devices and logical volumes. I’ve been using that instead of disk partitions for over a decade now. LVM gives you full control where logical volumes are placed, and a ton of other features I have not even tried out yet. It can provide software RAID, it can provide error correction, you can move around logical volumes while they are being actively used. In short, LVM is an awesome tool that should be in every Linux-admin’s toolbox.

Today I want to show how I used LVM’s cache volume feature to drastically speed up a Btrfs RAID1 situated on two slow desktop HDDs, using two cheap SSDs also attached to the same computer, while still maintaining reasonable error resilience against single failing devices.

Creating the cached LVs and Btrfs RAID1

The setup is as follows:

  • 2x 4TB HDD (slow), /dev/sda1, /dev/sdb1
  • 2x 128GB SSD (consumer-grade, SATA), /dev/sdc1, /dev/sdd1
  • All of these devices are part of the Volume Group vg0
  • Goal is to use Btrfs RAID1 mode instead of a MD RAID or lvmraid, because Btrfs has built-in checksums and can detect and correct problems a little bit better because it can determine which leg of the mirror is the correct one.
Continue reading “Speeding up Btrfs RAID1 with LVM Cache”

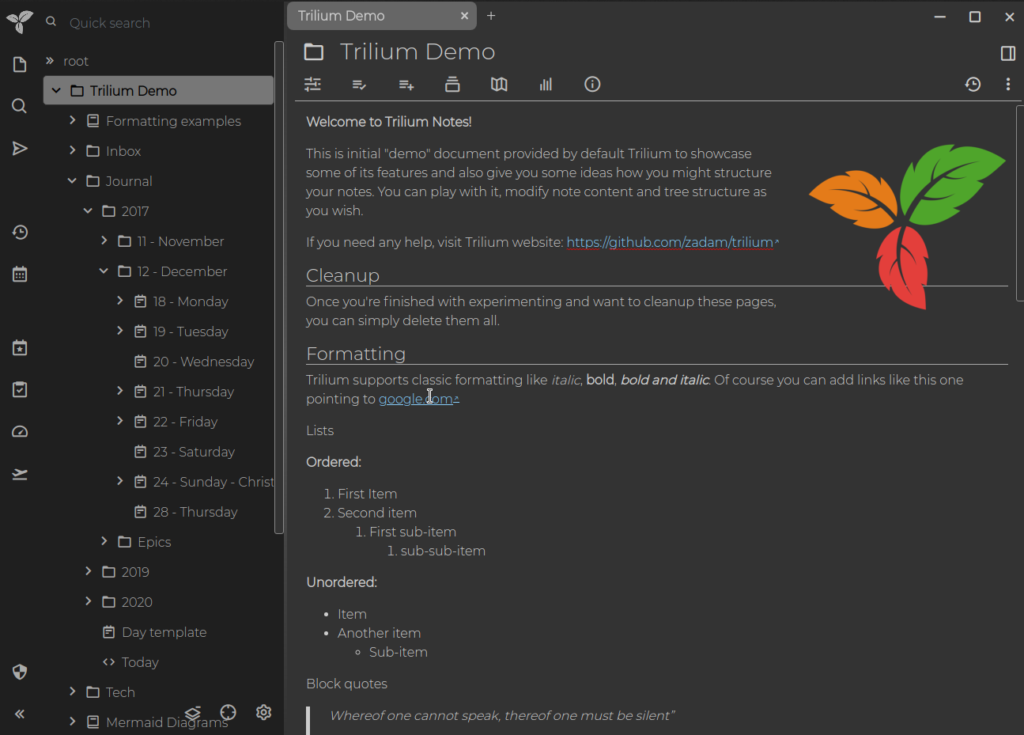
Trilium – An Awesome Note-taking App

I’ve been a long-time user of WikidPad for personal note-taking. Unfortunately, development has slowed down over time and it was time for me to look for some alternative. And wow, did I find an alternative, that really ticks most (all) of my boxes: meet Trilium, the most feature-packed outliner / hierarchical note taking app I’ve ever encountered.

Take a look at the screenshot tour to get a feeling of what’s possible with Trilium.

The features I adore most about it:

  • Can act standalone and in a client/server model
  • Server provides a browser-based interface to the instance
  • Client-application can work offline and then sync back changes to the central server instance
  • It’s incredible scriptable using JavaScript
  • mermaid.js support for quickly creating diagrams
  • Linking, Cross-Linking, Cloning of notes in various places
  • Journal functions

There are also a ton of features that I don’t use personally, e.g. encrypted notes that are only available once you enter your decryption password.

I personally recommend that you give it a look and try very much!

Moto G6 Plus without GPS Lock

I’ve been a quite happy owner of the Moto G6 Plus for some years now. Since the beginning, I always had a “minor” issue: sometimes the GPS started to suddenly stopped getting a lock. Which was especially cumbersome, if I was using the phone as navigation system while driving. Today, the GPS lost it’s locking mid-drive and I’ve not been able to reestablish it, not even by power-cycling the device. Also various attempts of changing battery saving options and changing location accuracy settings did not result in any improvements (normally it did). The internal diagnostics of the device (*#*#2486#*#*) just said it didn’t get a lock.

My assumption was that it somehow might be related to the A-GPS data. Therefore I looked if there was any tool in the Play Store that might help me clear the A-GPS data, and luckily I stumbled upon “GPS Status & Toolbox“. Even in the free version it allowed to clear the A-GPS data and from this “cold start” mode the device got a lock rather quickly. To support the devs, I decided to upgrade to the PRO version for less than €2,00.

I’m now curious if this is a long-term fix or if it was just lucky coincidence. I’m hoping for the first.

Quick Checklist

  • Disable battery optimizations on Google Maps (and any navigational map you might be using)
  • Disable battery optimization for the “LocationService”
  • Turn off WiFi- and Bluetooth-Background Scans since they might clash with Improved Google Location Accuracy setting
  • Use a tool (like GPS Status & Toolbox) to reset A-GPS data of the GPS receiver

Update 2020-01-06

Since I’ve installed “GPS Status & Toolbox“, the problem has been fixed. Never had the problem of not getting a GPS fix any more.

Congratulations to SpaceX!

Congratulations to SpaceX for the successful launch of their Falcon Heavy and all the best to Rocketman in his Tesla for his journey through our solar system. Don’t Panic!

Those were truly inspiring moments for any tech- and space enthusiast. Every minute of the video is exciting and time well spent.

I’m confident as never before that I’ll see people on Mars during my life-time.

(P.S.: I just noticed that this is my first new article since July 1st, 2014. Wow! It’s that impressive to me.)

Linux, Western Digital Green & Load Cycle Count

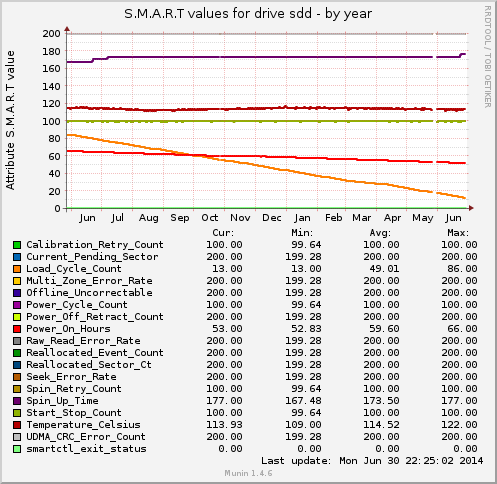
Today when looking at my Munin graphs for S.M.A.R.T. values of my always-on PVR box, I noticed that within a year, my Western Digital Green-line disks had degraded their Load_Cycle_Count attribute to a shocking low level of below 20 (in S.M.A.R.T., low levels are bad). The raw value indicated that the three of the four disks had parked their heads more than a half million times, each:

#$ for D in sda sdb sdc sdd; do sudo smartctl -A /dev/$D | grep "^193"; done
193 Load_Cycle_Count 0x0032 014 014 000 Old_age Always - 559966
193 Load_Cycle_Count 0x0032 200 200 000 Old_age Always - 111
193 Load_Cycle_Count 0x0032 010 010 000 Old_age Always - 572713
193 Load_Cycle_Count 0x0032 013 013 000 Old_age Always - 563615

Munin’s year graph for one of the disks showed shocking truth, the disk was aging fast:

/dev/sdd over the last year

When watching the above shell script with watch over time, I noticed, that some of the disks parked their heads about 2-3 times per minute. As the machine is always on, this sums up pretty quickly.

Research soon got me to several blog posts and forum discussions of the issues. Western Digital itself recommends using hdparm to disable advanced power management of the disk. This seems to be unsupported, by my drives, though.
Another way provided by WD, which has been often recommended, was downloading a DOS tool from Western Digital to set the idle timer of the disks. Not really the way I wanted to go.

Fortunately, I also found a blog entry that directed me to the idle3 project, that provides a way to set it from Linux.

The tool was very easy to compile (just one call to make), and then provided me with the current settings:

#$ for D in sda sdb sdc sdd; do sudo ./idle3ctl -g /dev/$D; done
Idle3 timer set to 80 (0x50)

Disabling the timer was easy enough for all four drives:

#$ for D in sda sdb sdc sdd; do sudo ./idle3ctl -d /dev/$D; done
Idle3 timer disabled
Please power cycle your drive off and on for the new setting to be taken into account. A reboot will not be enough!
Idle3 timer disabled
Please power cycle your drive off and on for the new setting to be taken into account. A reboot will not be enough!
Idle3 timer disabled
Please power cycle your drive off and on for the new setting to be taken into account. A reboot will not be enough!
Idle3 timer disabled
Please power cycle your drive off and on for the new setting to be taken into account. A reboot will not be enough!

The warning should be taken seriously though, the command took only effect after powering the whole system down, even though the drive itself reported idle timer to be disabled right away.

Update 2019-07-13: As I needed to adjust the IDLE mode of one of my Western Digital Red (WD30EFRX-68EUZN0) drives, I found out that more recent versions of hdparm support getting/setting the mode, even via certain USB adapters. This was a huge improvement for me, since the tool mentioned above requires the drive directly attached to a SATA port, which always required shutting down the PC and re-wiring the disks for changing the settings. The relevant command is as follows (replace it with your appropriate device). And yes, you need the scary parameter.

hdparm -J 0 --please-destroy-my-drive /dev/sde

It is still necessary to power down the device before the setting takes effect.

cygwin & Play Framework / Typesafe Activator

I am currently playing around with using Play Framework on cygwin. I noticed that Typesafe Activator, which has replaced the play command in recent Play versions, ruins the mintty terminal of cygwin: you won’t see any echo of your keystrokes after activator returns.

A simple solution is to blindly type stty sane into the terminal, which will reset it. Another way is, to wrap the activator in a special cygwin-activator bash script:

#!/bin/bash
activator $@
R=$?
stty sane
exit $R

flexget on Ubuntu 10.04 LTS

If you follow the official instructions to install flexget with existing Python 2.6 and python-virtualenv, than you might encounter the following problem:

flexget@host:~$ flexget/bin/flexget
Traceback (most recent call last):
File "flexget/bin/flexget", line 5, in
from pkg_resources import load_entry_point
File "/home/flexget/flexget/lib/python2.6/site-packages/distribute-0.6.10-py2.6.egg/pkg_resources.py", line 2655, in
working_set.require(__requires__)
File "/home/flexget/flexget/lib/python2.6/site-packages/distribute-0.6.10-py2.6.egg/pkg_resources.py", line 648, in require
needed = self.resolve(parse_requirements(requirements))
File "/home/flexget/flexget/lib/python2.6/site-packages/distribute-0.6.10-py2.6.egg/pkg_resources.py", line 546, in resolve
raise DistributionNotFound(req)
pkg_resources.DistributionNotFound: jsonschema>=2.0

At least on my system, there seems to be a jsonschema < 2.0 installed in the system site packages. This can be prevented by altering the initialization of the virtual Python environment as follows:

virtualenv --no-site-packages ~/flexget/

HOWTO: Fully encrypted vServer with Ubuntu 12.04

Update 2022-05-16: Today I learned that there are two official tutorials by Hetzner for Ubuntu 20.04. You might want to follow them instead:


In this blog post I am going to demonstrate how to easily setup a virtual server at Hetzner. This setup will work for most other vServer operators as well, but some adjustments may be required. Prerequisite is that you are able to access the console of  the server while booting, as you need to be able to enter the passphrase. You also need to be able to boot into some sort of “Rescue System” for the setup. This is no in-place setup. In Hetzner’s “Robot” this is pretty easy.

One thing to consider regarding security: fully encrypting a vServer might seem… senseless, as the host operator can easily copy the whole memory of the VM while running and extract the key this way. True. There is no way around this fact. My reason for wanting a fully encrypted system is more of the way that I want to be sure that the data is encrypted on the storage system. I want to protect from being unable to ever fully wipe the persistent data from disk in case I cancel the VM, the VM gets moved to a new host, or a failed disk is sent in to the manufacturer. For me, this is a compromise I can accept. YMMV.

You can also try this HOWTO under VirtualBox with the System Rescue CD ISO images. Actually, that’s where I verified all steps are working.

So, let’s dive into the fun of the HOWTO. BEWARE! THIS TUTORIAL WILL WIPE ALL DATA ON YOUR VSERVER! I TAKE NO RESPONSIBILITY IF YOU LOSE DATA!  IT MIGHT ALSO NOT WORK FOR YOU. USE THIS AT YOUR OWN RISK!

The following steps will partition the disk, setup LVM and LUKS, install Ubuntu 12.04 and prepare the system for reboot. Most parts can be copied line-by-line. Please beware that there are some parts in this tutorial that needs to be adjusted: UUIDs of partitions, hostname, username, and most important: network setup.

Continue reading “HOWTO: Fully encrypted vServer with Ubuntu 12.04”